Mini-Split Repair: How Ductless Systems Fail and How They’re Fixed
Most mini-split repairs fall into five groups: airflow and dirt, drainage, electrical and control boards, sensors and communication, and refrigerant. A proper repair starts by working out which group the problem belongs to, because the same symptom can come from any of them.
How a ductless mini-split works (and where it breaks)
A mini-split moves heat instead of making it. The indoor unit (the “head”) blows room air across a cold coil, which absorbs heat and pulls moisture out of the air. Refrigerant carries that heat through two copper lines, the line set, to the outdoor unit. There, a compressor and a second coil release the heat outside. In heating mode, a valve reverses the flow and the process runs backward.
Unlike most central AC systems, nearly every modern mini-split is an inverter system. The compressor and fans change speed constantly, directed by circuit boards that watch temperature sensors throughout the system. When something goes wrong, those boards often shut the system down to protect it and report a code or blinking-light pattern.
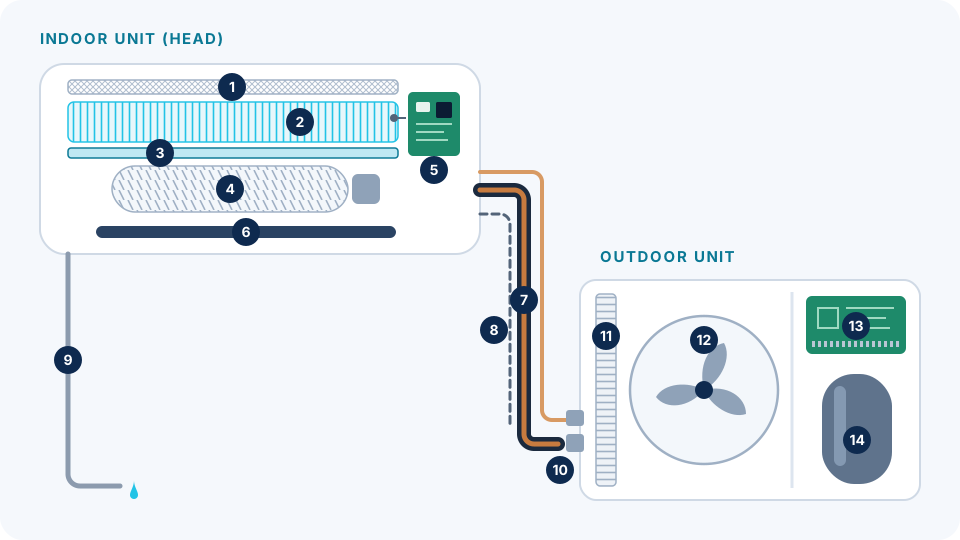
Each numbered part is a place where a real-world failure can start:
- Filters, coil and blower wheel (1, 2, 4): dirt and biological growth reduce airflow, leading to weak cooling, ice and smells.
- Drain pan and drain line (3, 9): clogs send water down the wall or out the front of the unit.
- Boards, sensors and the communication cable (5, 8, 13): the source of most error codes and “won’t turn on” calls.
- Line set, flare joints and valves (7, 10): the most common places for refrigerant to leak on a mini-split.
- Fans and compressor (4, 12, 14): mechanical and electrical wear, noise and overheating.
Mini-split problems by symptom
Start with what you’re seeing. Each guide covers causes, safe checks and when to call.
Not cooling or blowing warm air
Running but the room stays warm, weak airflow or short cycling.
Fix a mini-split that won’t cool about not cooling or blowing warm airNot heating
Cold air in heat mode, long pauses or steam from the outdoor unit.
Fix a mini-split that won’t heat about not heatingLeaking water
Dripping from the front of the head, spitting water or running down the wall.
Stop a mini-split leak about leaking waterFreezing up
Ice on the indoor coil, frosted copper lines or ice chips blowing out.
Why mini-splits freeze about freezing upRefrigerant leak
Slowly weakening cooling, frosted lines, hissing or oily pipe joints.
Refrigerant leak repair about refrigerant leakStrange noises
Rattling, grinding, buzzing, gurgling or loud clicking from either unit.
Decode the noise about strange noisesWon’t turn on
No response to the remote, dead after a storm or outage, or tripping the breaker.
Troubleshoot power problems about won’t turn onError codes & blinking lights
A code on the display or a light that flashes in a pattern.
Decode the error about error codes & blinking lightsCompressor problems
Outdoor fan runs but no cooling, or the compressor clanks or won’t start.
Compressor repair options about compressor problemsFan motor problems
Indoor blower or outdoor fan not spinning, running slow, or grinding.
Fan & blower repair about fan motor problemsWhat a technician tests on a mini-split service call
A good diagnosis follows the system from the simple to the complex, so you don’t pay for parts you didn’t need:
- History and codes. What happened, when, and what the unit is reporting. Many brands store recent faults even after the code clears.
- Airflow. Filter, coil face and blower wheel condition, fan speeds, and the temperature difference between air going in and coming out.
- Drainage. Drain pan, line slope, the outside drain outlet and any condensate pump or float switch.
- Power and communication. Supply voltage at the outdoor disconnect, the connection between indoor and outdoor units, fuses and board outputs.
- Sensors. Temperature sensors (thermistors) are checked against their expected readings. A sensor that reads wrong can make a healthy system behave badly.
- Refrigerant performance. Only when the evidence points there: line temperatures, pressures, superheat and subcooling compared with the manufacturer’s data. If a leak is likely, it’s located before anything is recharged.
Why “just add refrigerant” isn’t a repair
Refrigerant doesn’t get used up. If a mini-split is low, it’s leaking. Topping it off without finding the leak means paying again when it leaks back out, and running low in the meantime can overheat the compressor. See refrigerant leak repair.
The most common mini-split repairs
| Repair | What it fixes | Relative scope |
|---|---|---|
| Drain clearing & treatment | Water leaking from the head or down the wall | Small |
| Coil & blower-wheel deep clean | Weak airflow, ice, musty smell, water spitting | Small–moderate |
| Temperature sensor (thermistor) | Error codes, wrong temperatures, short cycling | Small–moderate |
| Fan motor (indoor or outdoor) | No airflow, noise, overheating shutdowns | Moderate |
| Control or inverter board | Won’t start, communication errors, dead unit after a surge | Moderate–large |
| Refrigerant leak repair & recharge | Poor cooling or heating, ice on lines | Moderate–large |
| Compressor replacement | Compressor failure (after other causes are ruled out) | Large, often compared with replacement |
Should you repair or replace a mini-split?
Most problems are worth repairing. Replacement becomes the better choice when several of these are true:
- The system is roughly 12–15 years old or more.
- The failure is a compressor or a leaking indoor coil, and the parts warranty has expired.
- Parts for your model are discontinued or hard to get.
- It’s an older R-410A system that needs a major refrigerant repair. New equipment now uses R-32 or R-454B, and those can’t be added to an R-410A system.
- The unit has needed several significant repairs in a short time.
We explain this in more depth in repair or replace your mini-split, and on the mini-split replacement page.
What affects mini-split repair cost
Honest pricing starts with a diagnosis, so be wary of anyone quoting a firm price for “a mini-split repair” over the phone. The main cost drivers are:
- The part involved: a drain clog and a compressor are very different jobs.
- Access: a head over a staircase, a high-wall unit in a two-story room or an outdoor unit on a roof bracket adds time.
- Parts availability: model-specific boards and motors vary widely in price and lead time.
- Refrigerant work: leak searching, evacuation and recharge add labor, and refrigerant type affects cost.
- System age and warranty: a registered system under parts warranty may only need labor.
- Diagnostic complexity: intermittent faults take longer to pin down.
For a deeper breakdown, read how much mini-split repair costs, and why.
What you can safely do before calling
- Check the remote: fresh batteries, correct mode (cool or heat, not fan or dry), and a setpoint below or above room temperature.
- Clean the indoor unit’s mesh filters with water and let them dry fully before reinstalling.
- Clear leaves, grass clippings and anything stored against the outdoor unit.
- Count any blinking-light pattern and write down codes before turning off power.
- If a breaker has tripped, reset it once. If it trips again, leave it off and call.
Leave these to a licensed technician
Opening refrigerant connections, adding refrigerant, working inside electrical panels or the outdoor unit’s control box, and handling capacitors or inverter boards. Inverter boards can hold a dangerous charge even after power is off.
Checked the basics and it’s still not right?
Call us with the symptoms. It helps if you have the brand and any blinking-light pattern handy.
Mini-split repair in Kyle, TX
ZoneCraft Air is based in downtown Kyle and works on ductless systems across the city, in established neighborhoods and newer communities alike. Kyle’s long humid season and hot summers put mini-splits under heavy load for months at a time, so drain, coil and airflow problems deserve extra attention here. Learn more on our Kyle service area page, or contact us to schedule.
Mini-split repair FAQ
Is it worth repairing a 10-year-old mini-split?
Often, yes. Ten years is middle age for a well-maintained mini-split. A drain, sensor, fan motor or board repair is usually worth doing. The math changes if a 10-year-old R-410A system needs a compressor or a new indoor coil, because those repairs can approach the cost of new equipment.
Can any HVAC technician repair a mini-split?
Any licensed HVAC technician can legally work on one, but ductless inverter systems have their own diagnostics, fault codes and installation practices. It’s reasonable to ask whether the technician works on mini-splits regularly.
Will a repair void my manufacturer’s warranty?
A proper repair by a licensed technician shouldn’t. Warranty terms vary by brand, and many require the system to be registered and professionally installed. If your unit is still under warranty, have the model and serial numbers and your installation date ready so warranty parts can be checked.
Why does my mini-split work for a while and then stop?
That pattern usually points to a protection shutdown: the system senses overheating, high pressure, ice or a full drain pan and stops itself. Common causes are dirty coils, a failing fan motor, low refrigerant or a clogged drain triggering a float switch. Note how long it runs before stopping; that detail helps the diagnosis.
Get a proper mini-split diagnosis
We’ll find what’s actually wrong, explain it clearly and quote the repair before any work starts.